The BP to above shows the functions to allow the cube to be damaged when the player collides with the collision mesh component, a sound is played and the final part of the BP stops the collision on all geometry so they don't interact with the character.
I developed the blueprint to reveal a coin when hit, the coin is hidden inside the geometry and uses a Timeline function. Double click the function to open the time line, add a Vector track and place the points for the start middle and end of the animation. This is shown i the Blueprint (right)
(Below) Complete Actor Class Blueprint
I used a rock texture that comes with the UE4 starter material
I started with developing the main character model, below I documented my process. There are relevant blog posts covering what sections where being worked on and the desired outcomes.
Left: hover your mouse over the annotated documentation for more detail.
From moodboard, concept mockup to sculpting with Zbrush.
My aim was to create a more detailed version of Bark but give him more cartoon look.
On reflection this would have been difficult to place in the low poly environment that I had designed for the setting.
Above: Creating the skin from Zspheres
Below: My first attempt at a speed sculpt video to show the progress in Zbrush.
I show how I screenshot information from forums as I'm working and annotate them for later use in my documentation.
I decided to leave developing Bark to focus on learning the Unreal engine, this was due to having time off due to health complications.
Because my aim for this project was to produce a prototype game I needed to work on learning how to use the software, breaking this down in to the following areas:
-
Basic Navigation of UI & Functions
-
Creating Terrain
-
Importing Assets
-
Lighting
-
Creating Blueprints
-
Learning Specific Mechanic Blueprints
-
Create a GUI
-
Testing
-
Packaging and Exporting

Production

Character Sculpting
Above: I spent a few weeks doing research and trialling different aspects of the UE4 software, with a basic knowledge of what is possible I did a video showing how I built a test level.
Below is a video showing how I created
the double jump blueprint using the
visual scripting a node based interface
making coding easier and more appealing
to the masses.
Below: Further development within Zbrush experimenting with different tools.
Polygroups - This is a feature within Zbrush that gives you the ability to group sections of a mesh, not only is it visually easier to see the sections you can Shift + Click on a group to isolate that group from the rest. It's much faster than having to mask the sections you want each time you need to work on them separately. In the video I use polygroups to create the eye sockets. I also used Polyloop to create an edge to extrude out adding more detail. Also a good method for maintaining stronger edges when Zremeshing.
Below: A video showing the modelling process of procedural platform sections in 3Ds Max.
My aim was to create sections that would fit together easily and save me building a level using the terrain editor within UE4, the reason for this was due to my experience with the terrain editor. I wasn't sure how I would make it low poly to fit with the theme of the environment I was trying to create.
Below is a video showing some of the initial issues I came across when using the sections I'd made in 3Ds Max
I mentioned in the video about there being a scale issue, the sections wouldn't align properly. This was one of those situations where you're looking to hard at the problem, once I'd gone away to investigate what could be the problem I realised it wasn't a scale issue I just needed to flip the section instead of rotating it due to the way I'd created the edges.
Left: A source of research for everything Zbrush.
Source: ZbrushCentral.com
Article: How can I delete zspheres?

This threw me off because I'd modelled the pieces as 250x250cm squares, but I hadn't taken into account for the edge I'd added. Once I'd realised the issue it was simple to get everything looking as I wanted.
Below are all the sections I created.

Research Source:GameDevMan YouTube channel
Topic:Side-Scroller tut in 15 mins
I touch on blueprints earlier when creating a simple 'Double Jump' function for my character, this function was created using nodes within a Blueprint Class often referred to as a Blueprint.
This type of blueprint is different from the level blueprint because they can be spawned as instances in any level where as the level blueprint is specific to the level it's created for.
There a several different types of Parent Classes which determine the type of blueprint you are going to create. Below is a table of the most common Parent Classes (Source:UE4 Documentation - Blueprint Class)


The event that fires off this blueprint, in this case it is when the actor (Our Jump Pad) is overlapped by something else.
This node 'Cast To' calls on our playable character as this is what we want to function to effect
This node 'Launch Character' is a function. Next to the orange connector pin we can effect the X,Y or Z axis
Finally all the connector pins have to be attached in this way for the blueprint to be complete.
Jump Pad Tutorial Source:Unreal Engine YouTube channel
Published March 2015
I further developed this blueprint with a textured FBX created in 3Ds Max and added a sounds effect to be played as part of the blueprint. See image below
Below is a Actor Blueprint for a simple 'Jump Pad'
On opening the blueprint the default tab is the Viewport this is where you can add the mesh, pawn sensors, sound, etc. Starting with a cylinder the important part is on the Details tab to the right of the screen, under Collision make sure Generate Overlap is ticked and for the Collision Preset choose OverlapAllDynamic. Click the image below for fullscreen.


The get actor location is so that the function 'Play Sound at Location' knows where to play the sounds, it does not travel with the character when it leaves the jump pad.
Creating Animated Lava Material
Throughout the tutorial video I take screenshots writing out the keyboard shortcuts I'm using, these are in the gallery below.
You'll notice I added further nodes after the Texture Sample, I've detailed them on the final completed Blueprint below.

This is another Parameter node labelled Brightness, with a Default value 10
This Lerp node is only used to create the alpha image, note it's input is the Red connector pin using values;
Const A:-1.0
Const B:1.8
 |
|---|
The Parameter nodes give the ability to quickly change the material. Right is an image of the Details tab from an Instance of the Lava material showing under the Parameter Groups label the Scale & Brightness

Throughout the process I'd been updating Shotgun detailing different aspects being worked on, any challenges and issues that needed addressing. Right is a short video showing this process.
Below I explain how to organising the task list and Gantt chart within Shotgun which helps when looking at what needs to be done.
Creating A Test level
I'd played about with some tutorials and decided it was time to put some things together into a sort of prototype level. Here is the creating process.
So the aim was to create a simple level with an enemy, collectable, finish with stats screen, health system, time and basic HUD.
This took a few hours to complete and was meant to be a test of what I'd picked and what I still needed to look at in more detail.
The video (Right) shows a quick run through of the finished test level.
Collectable Blueprint
A test version (Right) realised I needed a points system, I'd made a note that the points system would be attached to the Class BP. This wasn't exactly correct, it needed to be put in the character or level blueprint because it had to be part of a constant otherwise once the collectable was destroy, as functioned to do so in the event graph, the data for score would be lost. The blueprint below shows where I stopped.
When I came back to edit the blueprint there was no geometry, this was when I found the issue related to the Destroy Actor function mentioned earlier on this page.


The image below is the veiwport when I'd created the same Blueprint using my imported Acorn mesh, everything was missing, point light and geometry.
(Right) is the video about the issue.

Enemy AI Blueprint
I created a test enemy following a few tutorials by Virtus Learning Hub.
Source:Creating Basic Enemy AI Bot
Source:Creating Player Health System
Below are the annotated screenshot
taken during the video which explain in
more detail what I was doing.
(Above) In this blog I wrote about how I'd got confused when looking for an illusive node, I did show how I'd gone about looking for answers. The final image in the gallery (Left) shows my post on the Answer Hub of the UE4 forums.
All went well with the prototype level so I started to look at other elements I could implement that would enhance the fun aspect of my game.
This led me down another path that didn't prove to be useful in my final prototype build but I did learn other aspects that are possible within UE4 that I would like to include.
Breakable boxes
Inspired by the boxes in Crash, Mario and Sonic I came across a tutorial on how to create them.

Starting with a simple cube, right click and select destructible mesh, choose a random seed to fracture by then click fracture mesh.
I created a Brick BP actor class added the destructible mesh, collision component and plane, the collision component is positioned under the cube mesh approximately the same surface area of the bottom. The plane is to make the box break in the air, without it the brick will fall and break on the ground all the player.

Lighting
Study


(Above) Video showing the build process
Research Source:Resurrection 21 YouTube Channel
Spline Path
My thoughts were towards camera like in Pandemonium on the PS One, I'd played about with Camera Lookup functions for things like when the volcano erupts and other such events that I'd want the player to see.
There aren't many tutorials about Spline Paths but I found one that was exactly what I had in mind, understanding it and utilising it for my project would have required more knowledge and research time that I didn't have. I did follow the tutorial and came across a few issues that I struggled to get solutions to.
The other option was to create a path for the player and have the camera follow a path, but again I was going in a direction away from creating a fun prototype and my research stressed 'Keep the camera simple' .
Here is the basic principle of what I achieved, notice the wall I had major issues with this because when put across the spline with collision on it broke the path and even if the character could jump the obstacle it caused a strange interference with the camera path.
Friendly AI
The friendly AI is a copy of the roaming enemy but with a few tweaks, I've taken out the damage to the player and destroy actor functions. There is an area around the friendly AI that if the player character is not within range the friendly AI will stop following.
I liked the idea of this for animals that could be saved along your journey.


This started with the volcano, I created a simple procedural mountain/volcano using a gradient ramp map in 3Ds Max's material editor.
Intro to UE4
Building Terrain
I'd been struggling with medication throughout this project and it showed, I couldn't concentrate, finding it difficult to do basic tasks that I should have had no problem with.
It was during this part of the project where I'd finally been referred to the pain management specialist for help controlling the pain and managing a medication regime that would allow me to finish my degree.
During this time it was at this point that I wasn't able to function well enough to continue, It was difficult picking up the pace when I came back to continue this project. I decided not to waste any time trying to figure out where I'd left most of the test components including the terrain, I wasn't happy with it and there had been issues creating the collision mesh within Unreal that would make the terrain unusable. The main issue was the character would clip through the geometry and crash the game.

Unreal have something called
Marketplace, a community where other developers and artists can published their work, I'd downloaded a few low poly assets during my research phase as reference material. It didn't take long to find some useful procedural low poly environment pieces.
I'd purchased a Platform pack during my development phase to help understand how to create moving platforms, this came in very handy for rocks that collapsed after a delay. I used them as stepping stones over a lava section.
Source: Ready Platforms by Unforgiven
I decided to invest in an online course by Udemy, this was to help me get back into a routine of producing structured work. The first course was an Arch Viz project and covered aspects of lighting which was something I hadn't looked at in detail before.
Source:Udemy Course
The setting is an apartment
living room with a balcony
and corridor.

I started by creating the basic room shape with BSP brushes
BSP = Binary Space Partitioning
The room assets where part of the course material, including textures.
Production


Lighting in Unreal 4
-
Directional Light – This is used to simulate sun light within this Arch Viz project. In the Unreal 4 documentation the directional light is described as boundless, all shadows cast by this light will be parallel.
-
Light Mass Importance Volume “LMIV” – This helps to create detailed, high quality lighting by asking the engine to pre-compute the portions of light within the LMIV area. This only applies to static and stationary lights. This feature improves the accuracy of light reflections.
-
-
Light Mass Portal – This tells the engine where windows or transparent planes are to help flood light through these areas. The engine will know where the light is coming from, these are used when the level/scene is lit using a Sky Light and HDRI, because the engine knows the areas covered with the LMP, light mass importance volume will be able to generate higher quality light and shadows. This results in a more realistic effect, vital for Arch Viz projects.
-
Sphere Reflection Capture – These reflection capture actors are used to help enhance the reflection of light within the level or scene, for example we can see the painting in the reflection of the TV (Image Below-Right). This is created using the sphere reflection capture actor collecting all the image data it can see from its centre and projecting out into the scene, that reflection image blends with other reflection capture actors and creates a clearer reflection image within reflective textured surfaces.
Rendered Result Reflections within Unreal
-
Sky Light – This is needed to enhance shadows, it collects distant parts of the environment and applies it to the level/scene as light. This helps the ambient lighting, as of version 4.18 the skylight has a multi-bounce setting which can affect the lighting and shadows in more dramatic ways. This feature is essential for enhancing lighting and shadows to create a more realistic look and feel.


Small changes that make a big difference to the final image and how the light reacts with assets in the scene. It's little things that make a scene realistic, we pickup on so much that we sometimes could put our finger on.
Post Processing “PP”
This allows the user to alter the visual effects of the environment, this can be restricted to the area of the post processing box or set to ‘unbound’ effecting the entire environment. If bound to the area of the box this could be used to affect the final look and feel of that area, for example a cold and dark cave. There could be another PP area when the user exits the cave, for example walking out into the bright warm sun light. This example could be done by reducing the temperature of the light within the cave PP and increasing the temperature of the PP area on exiting the cave. There are many changeable features allowing for a vast range of effects.

The other features I’ve learnt about were for an Arch viz project, all of which focused around lens effect.
-
Bloom: This helps to enhance realism when rendering, this effect of creating a blur around the object while increasing the emissive intensity making the object appear brighter, simulating this real world light occurrence. “Bloom can be seen by the naked eye when looking at very bright objects that are on a much darker background.” – Direct quote from Unreal online documentation referencing “Post Processing Features Source:PostProcessEffects-Bloom
-
Dirt Mask: This effect simulates dirt, scratches, etc, on the lens of as camera, also used to simulate a specific camera look.
-
Auto Exposure: This effect looks at how our eyes adjust to changes in the amount of light we’re exposed to, for example the way our eyes adjust when leaving a dark room and walking into bright sun light. The changes available in this area should be approached with caution because changes that are to dramatic can ultimately ruin a scene.
-
Lens Flare:
See Image Right
-
Ambient Occlusion: This effect adds a subtle darkness to corners, cracks, nooks and crannies, to enhance the realism of a scene/level. A very effective feature for achieving a realistic look
-
Global Illumination: Alters the indirect light that adds to the scenes brightness, without it a scene would look unrealistically dark. The majority of surfaces bounce light which in the real world contributes to how we view our environment; Unreal’s post processing global illumination helps to simulate this realism. Brightly coloured objects can affect the colour/tint of bounced light; this can also be simulated within the global illumination settings.
-
Screen Space Reflections: This effect alters the appearance of objects in reflections – “Screen Space Reflection is an effect which is enabled by default that alters the appearance of objects on the surface of Materials. There are only a handful of options that can be tweaked for this effect which are outlined below. Intensity, Quality and Max Roughness.” Direct quote from Unreal documentation Source:Post Process Effects-Screen Space Reflections

Final Touches
-
Light IES: This is more accurate light info supplied by the manufacturers, to activate this feature select all the lights, scroll down the details tab to light profiles. Select ‘Complex_IES’ for the IES texture and tick ‘use IES intensity’, for the changes to take affect the lighting will need building.
-
Before uploading or sending work to a client it’s best to set the lighting quality to ‘Production’. This should be done incrementally when building a medium to large scene/environment.
During the course I learnt how to use the Sequencer to enhance the production of my work. This gives me more options of how I can display scenes and projects.
Low poly assets

Left - A collection of low poly foliage I created in 3Ds Max
Water Material
In a similar way to the Lava material detailed earlier I created a low poly animated water material.


Low-Poly Tropical Island by BRAiNBOX
https://www.unrealengine.com/marketplace/lowpoly-tropical-island

Left - I downloaded a developers pack from the marketplace.
This was a reference guide at the beginning of the project but I decided to use it at this stage so I could focus my time inside Unreal creating the prototype than modelling the terrain.
Right - I created the landscape from the modular pieces and added my foliage assets. This save me a lot of time, once the first sections were together I opened each modular piece and increased the accuracy of the collision mesh. This tells the engine that the asset can collide with other elements in the scene such as the character and pawn actors


Left - Here is a section of the terrain where the collision mesh was causing an obstruction for the character. Because I'd set the collision mesh for all the pieces being used to 100% and due to the low poly nature of the terrain, the volcano's collision mesh was clipping through the terrain where the player could access stopping the character from moving there.
Right - A short video explaining what I'd been working on in Unreal.
I mention in the video about another section of the terrain that I was having the opposite issue with the collision mesh, the player was falling through that section. To fix this I removed the collision and reapplied it at 100%
Below - A short video showing development of the environment
Left - A post I'd wrote following coming back from college I mentioned Mixamo and Animations for my character.
Once all I had a walk, run and idle pose animation uploaded to Unreal I created a Blend Space found in the Animation when creating new content.
Below - a post demonstrating the blend space for Bark
UMG
UMG stands for Unreal Motion Graphics User Interface Designer, used for creating menus, HUDs (Heads Up Display) and any interface graphics for the users.
The base of UE4s UMG are the Widgets, found under inside the Content Browser, under User Interface, Widget Blueprint; we build the HUD or what ever we want to display.
In the widget blueprint there are two initial tabs:
-
Designer - This is where we can build and design how the interface looks.
-
Graph - This is where we apply functions to elements displayed such as buttons, check boxes, etc.
Click the image for fullscreen view of the HUD Widget BP

In the HUD Widget BP above there are three elements:
-
Time Remaining - Timer system is stored in the Game Mode BP
-
Health Bar - Health system is stored in the Character BP
-
Acorns Collected - Points system also stored in the Character BP
Below is the function graph to get the remaining health of the character, to retrieve information for another BP we must use the function node 'CastTo'. In this case we are looking for the Health system which is stored in the Character BP called Bark


Above - Event Graphs for the function bound to the Time Remaining text on the level completion screen (Below).


Left - Adding text, background, collectable image and clickable text at the bottom is a good base for the end screen. I'd annotated a screen shot to show what the current screen looks like in game.
In the Gamemode BP is a function to add the out of time screen if the timer reaches zero (below)
The next stage was a little more in depth, Start Menu. This needs three basic elements;
-
Start Game
-
Options - Sub Menu to change the screen resolution
-
Exit Game
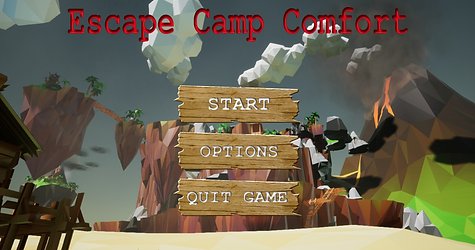
I wanted to configure my game so the Start Menu was the first thing to appear, this meant creating a new map called MainMenueLvl and a HUD Class.

To create the Main Menu HUD add a new blueprint class but instead of selecting one of the Common Classes click the All Classes tab underneath and search HUD (Image Right)
Once in the Event Graph I wanted to have the Widget appear on screen when the Main Menu level is loaded, for this we've started with the 'Event BeginPlay' node, 'Create Title Screen Widget' selecting our Title Screen in the Class, 'Add to Viewport' (This tells the engine to display the Widget) and finished with 'Play Sound at Location'


Now we can create the Title Screen Widget, the main difference between this screen and all the others is the Options buttons default as invisible until the options button is clicked. Once clicked the primary buttons and the options visibility are switched.
Below - the finished Title Screen.
Right - The Title Screen Event Graph, all the functions are grouped and labelled according to which button they are bound to.
Click image for fullscreen
